Oh my goodness, when the sun starts beating down and your dog is panting for something light, you need a winner! Forget heavy things; we’re talking pure, refreshing goodness here. I stumbled into this recipe completely by accident last August when I had a giant, almost intimidating seedless watermelon on my counter. I thought, why not see if I can turn this juicy fruit into something durable? I am thrilled to report that this Low-Calorie Watermelon Dog Jerky is surprisingly chewy once dehydrated. It’s the ultimate light, hydrating snack for my guys, perfect if you have a pup who needs healthy dog treats homemade but watches their weight. I learned reading up on the basics that while the fruit is generally safe, you have to be careful about everything else, which is why sticking to just the fruit is so great. You can check out what the experts at Canine Journal say about watermelon safety, too, just to be sure! I still can’t believe how something so watery becomes such a satisfying little crunch-chew.
Why You’ll Love This Low-Calorie Watermelon Dog Jerky
Honestly, making this treat gives me such peace of mind during the summer months. It’s amazing how simple something so beneficial can be! You’re not messing around with weird fillers or sneaky sugars here. Trust me, your dog is going to go bonkers for these lighter bites.
- It’s incredibly hydrating, perfect for those hot days when you want to boost their water intake naturally.
- If you’re watching your pup’s waistline, this snack is virtually guilt-free—super low-calorie!
- You only need one ingredient, which makes prep a total breeze. Seriously, it’s my go-to for fast, healthy dog treats homemade.
- The chewy texture they develop after the dehydrator feels really satisfying when they chew on them.
Essential Equipment for Making Low-Calorie Watermelon Dog Jerky
When you’re diving into Dog Dehydrator Recipes, you can’t skip the actual dehydrator—it’s the heart of the operation! This recipe is thankfully super minimal on gear, which keeps things easy for you. We aren’t dealing with weird attachments or complicated steps here, just the essentials to get that perfect dry structure for your Homemade Dog Chews.
What You Need for Dehydrated Dog Treats
You only need two main things hanging around your kitchen to make these work beautifully:
- A reliable Dehydrator. This machine does all the heavy lifting for you!
- Plenty of Paper towels. Seriously, stock up—you’ll be surprised how much liquid you pull out of that watermelon.
Ingredients for Your Homemade Dog Chews
You might look at this ingredient list and think I messed up because it’s so short! Nope, that’s the beauty of these Natural Dog Treat Recipes. Watermelon is packed with flavor all on its own. When it comes to making these DIY Dog Treats, the quality matters more than the quantity.
Ingredient Clarity for Low-Calorie Watermelon Dog Jerky
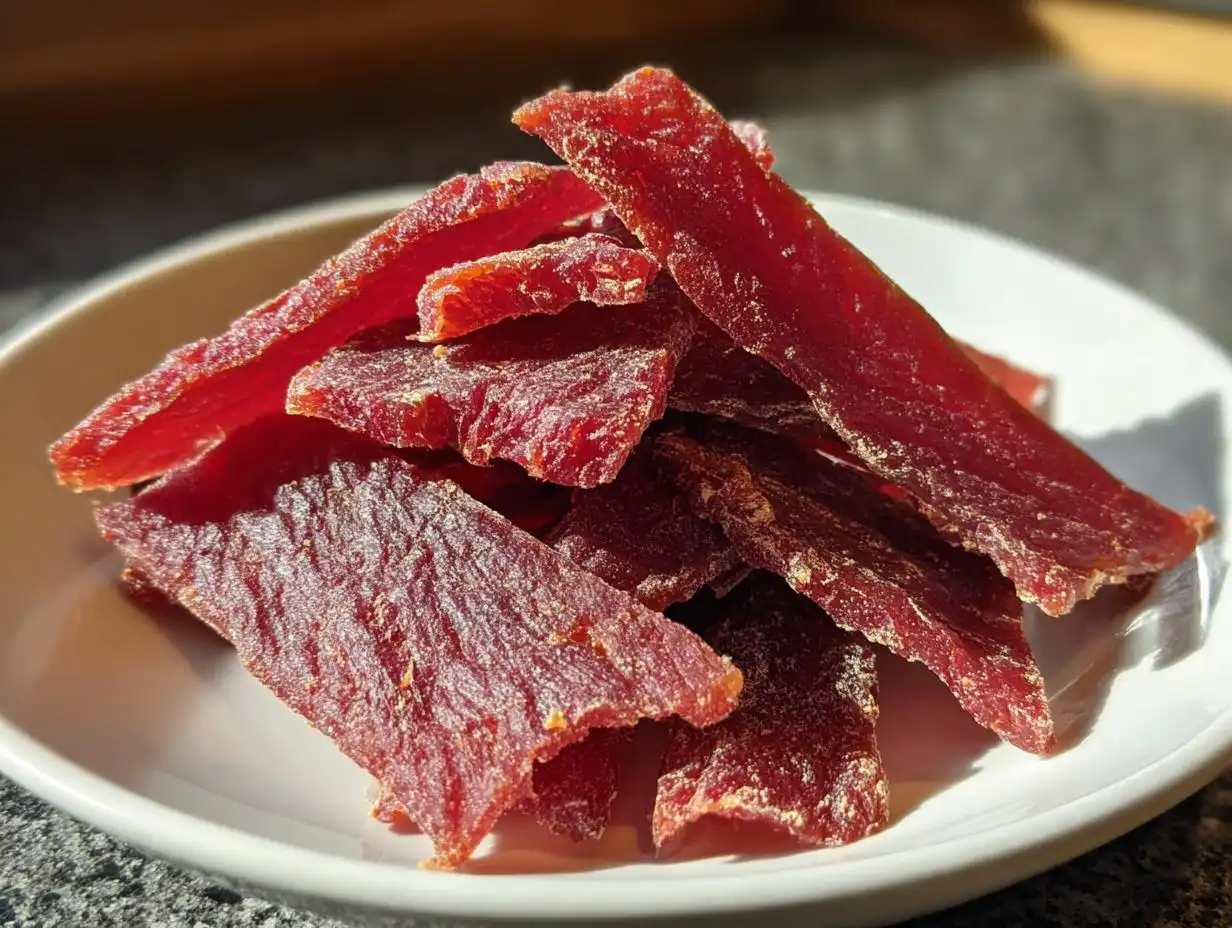
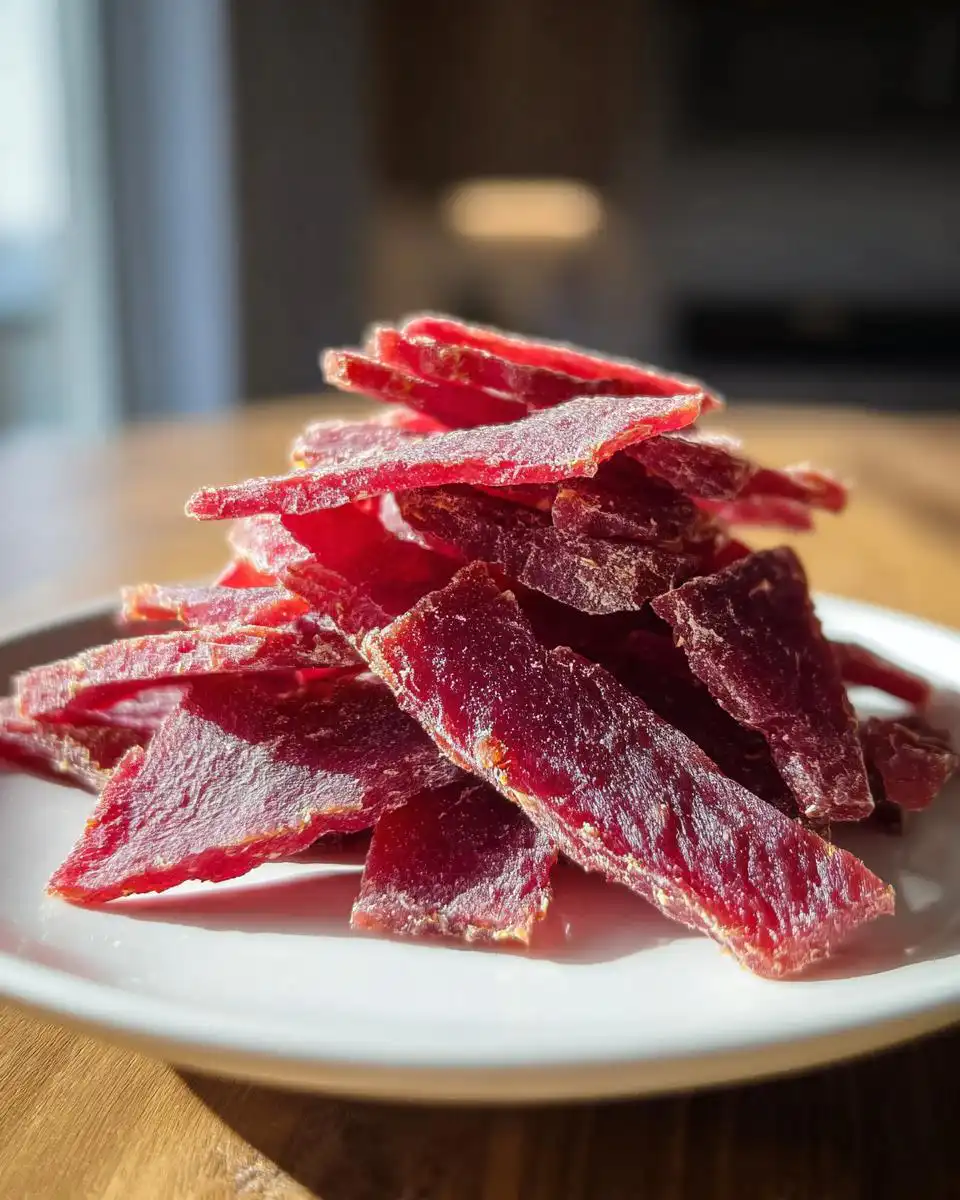
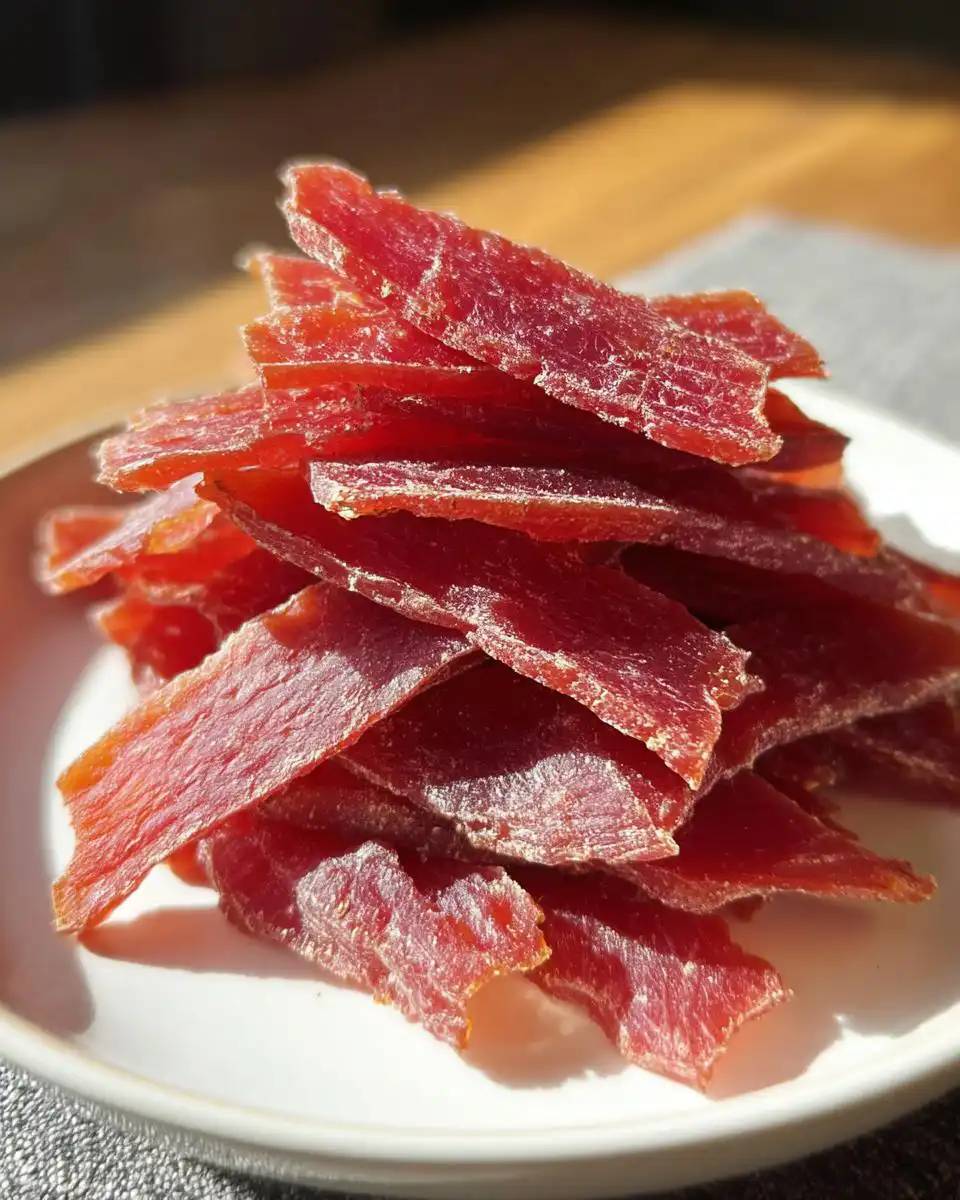
You truly only need one item here: one whole seedless watermelon. But listen closely, because this is critical for successful Dehydrated Dog Treats. You must completely, absolutely, 100% remove every trace of the green and white rind. The rind won’t dry properly and it definitely won’t taste good to your dog. Get ready to get pink fingers!
Step-by-Step Instructions for Dog Dehydrator Recipes
Okay, once you have your rind-free watermelon chunks ready, this is where we get down to the satisfying work of turning mush into chew! Getting the initial moisture out is the biggest secret to making these amazing Dog Jerky Recipes last. Always check out my guide on dehydrated chicken strips—the prep setup is almost identical, just with fruit instead of meat.
Preparing the Watermelon Slices
First things first: cutting! I aim for strips that are super thin, around 5 mm thick. Think of them like thick-cut French fries, but flat. You want them uniform so they dry evenly, which is key for Homemade Dog Chews. Once they are sliced, grab those paper towels! You need to pat every single strip down until you think they can’t possibly get any drier. Seriously, blot, blot, blot! Getting rid of that surface water helps them cure instead of steam in the machine. Don’t skip this blotting step, or the texture will be all wrong.
The Dehydration Process for Natural Dog Treat Recipes
Next, load up your dehydrator trays. This is important: make sure every strip is sitting in a single layer, and none of them are touching or overlapping. If they touch, they’ll stick together, and you’ll end up with one giant watermelon sheet! Set your dehydrator temperature to 55° Celsius, which is 130° Fahrenheit—nice and low. We want to dry these beauties slowly. Let them run for a good 10 to 12 hours. Sometimes, if my melon was extra juicy, I push it to 14 hours. You can read more about safe dehydration practices when checking out AKC’s advice on watermelon if you’re curious!
After that long, slow dry, you’ll pull them out, and they will still feel slightly warm and pliable. That’s fine! Don’t worry about them yet; the real magic happens in the next step.
Tips for Perfect Low-Calorie Watermelon Dog Jerky
Getting these treats just right comes down to managing moisture, which is tricky when you start with something 90% water! We want that perfect texture that makes them good Dog Treats for Chewing without being fully rock-hard. If you’ve made my carrot and sweet potato chews before, you know how important that final texture check is when you’re aiming for homemade dog chews that last! Check out that recipe for comparison.
Achieving the Ideal Chew Texture
After pulling the trays out—and trust me, you’ll be tempted to test one immediately—you have to resist! The jerky will still feel slightly soft when it’s hot, but it firms up as it cools. You need to let these cool completely, usually about an hour, before you test for that final firmness. Before cooling, the strips should look darkened and shrunk, with no shiny, wet spots visible on the surface. That’s your cue to turn the machine off.
When they are cool, pick one up. It should bend slightly, but if you try to twist it, it shouldn’t break cleanly in half; it should tear with a bit of resistance. If it snaps like a cracker, it was slightly overdone, but still safe! If it feels sticky or squishy, throw it back in the dehydrator for another two hours. This cooling period is crucial for those Natural Dog Treat Recipes to set up properly.
Storage and Shelf Life for Homemade Dog Treats
Once your beautiful batch of Low-Calorie Watermelon Dog Jerky has cooled down completely—and I mean totally room temperature, no warmth left—it’s time to seal them up tight. Since these are just pure fruit and have no preservatives, keeping the air out is your best friend for safety and freshness.
You absolutely must use an airtight container. I prefer heavy-duty glass jars with tight-sealing lids, but any good quality plastic container that locks securely works fine for these DIY Dog Treats. Keep them stored in a cool, dark pantry, just like you would keep your own dried fruit.
If they were dried properly at that 10-12 hour mark, they should easily last for about three weeks sitting right there on the counter. If you want them to last much longer, toss the airtight container into the fridge, which easily doubles that shelf life. Check them every week—if you notice any condensation forming inside the jar, they weren’t quite dry enough, and you might need to run them for a couple more hours next time.
Nutritional Snapshot of Low-Calorie Watermelon Dog Jerky
Since we are only using pure watermelon here, this is incredibly simple! I know some of you look for full labels even on Homemade Dog Treats, so here’s a quick peek at what you are giving your pup per serving of this super light jerky. Remember, these numbers are estimates based on the weight of the fruit before drying, but they show you just how minimal this is!
It’s so satisfying knowing these are packed with goodness, too. For other light and refreshing ideas, check out my water-based dog popsicles for really hot days!
- Calories: About 25
- Carbohydrates: 6g
- Protein: 1g
- Fat: 0g (Yes, zero!)
- Sodium: Only 5mg
- Sugar: About 5g
The real win here is that you get great hydration and natural vitamins without any significant calories or fat. That’s why these are such a fantastic option for pups keeping trim!
Frequently Asked Questions About Dog Jerky Recipes
I know sometimes when we’re making Homemade Dog Treats, we get stuck on a few details! It’s totally normal when you want to make sure everything you prepare is top-notch. Here are some of the most common questions I hear about these speedy Dog Jerky Recipes.
Can I make these Low-Calorie Watermelon Dog Jerky treats without a dehydrator?
That’s a great question! While the dehydrator is definitely my favorite tool for making crispy, chewy DIY Dog Treats because it maintains a steady, low heat, you can absolutely use your oven if you need to. Just set your oven to its absolute lowest setting—usually around 100°C (200°F), maybe even slightly lower if you can manage it. You need to prop the door open just a tiny crack using a wooden spoon so the moisture can actually escape. This will take longer, probably 6 to 8 hours, so keep an eye on them! Just remember, the dehydrator is just better at consistency.
How long do these Homemade Dog Treats last?
If you followed the steps and made sure those watermelon strips were properly dried and then cooled completely before storing, these treats are pretty robust. Stored in a truly airtight container at room temperature, they should stay perfectly good for about three weeks. If your kitchen is especially hot or humid, pop that sealed container into the fridge! That buys you another week or two. If you want more ideas on long-lasting Homemade Dog Chews, you can check out my general guide on homemade dog chews for tips on handling different types of jerky.
And just so you know, if you feel nervous about safety, the American Veterinary Medical Association has some nice info on fruit safety you can glance at here: PetMD on Watermelon. It’s always good to be informed!
Sharing Your Healthy Dog Treats Homemade Creations
Well, that’s it! You’ve made some delicious, super light Low-Calorie Watermelon Dog Jerky. Now, I absolutely need you to tell me how your pups reacted! Did they gobble them up instantly? Did they look at you like you were crazy for giving them dried watermelon?
Please hop down below and leave a rating—it helps me so much! If you took a picture of your dog with their new favorite summer chew, please share it on social media and tag me. I love seeing your successful batches of Healthy Dog Treats Homemade! If you’re looking for more simple ideas like this, don’t forget to browse my full collection of homemade dog treats for endless inspiration!

Low-Calorie Watermelon Dog Jerky
Ingredients
Equipment
Method
- Cut the watermelon into thin strips, aiming for about 5 mm thickness.
- Pat the strips dry using paper towels to remove as much excess moisture as possible.
- Place the strips on dehydrator trays in a single layer, ensuring they do not overlap.
- Dehydrate at 55°C (130°F) for 10 to 12 hours.
- Remove from the dehydrator and allow the jerky to cool completely until it reaches a chewy and dry texture.